black sheep goods ·
crafting ·
diy ·
dyeing ·
ice dyeing ·
printing painting dyeing ·
tote bag ·
tutorial ·
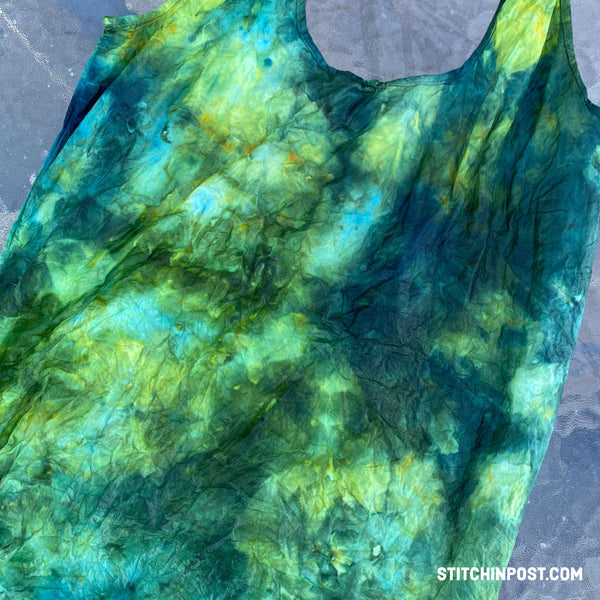
Trying Ice Dyeing

We had a blast trying the new ice dyeing kits from Black Sheep goods. It's a straightforward process that is easy enough, so you can focus on the fun of watching the ice melt and seeing all the patterns the dye made. So cool!
We have kits for tote bags and tea towels each in three color options, but did our experimenting with a tote bag kit in meadow.


The Black Sheep Goods kits have almost everything you need - the instructions, three dye colors in shaker bottles, soda ash, gloves, a stir stick, and the 100% cotton item to be dyed. You need a basin, some kind of rack to hold the item off the bottom of the basin, ice, and a face mask to complete the project.

The instructions tell you to mix the pre-measured soda ash with a gallon of hot water in a basin, and soak your tote bag for a minimum of 20 minutes. You can get your bag soaking while you set up the rest of the equipment.

Once the soaking is done, wring out the bag. Then scrunch it up onto a rack over a basin. Be sure not to use a rack you plan to cook with later, and leave a couple of inches of clearance at the bottom of the basin for the ice to drain into. Check thrift stores for old racks, or try clean wire mesh cut to size.

Pile the ice (both cubes or crushed ice will work), two to three inches deep on top of the scrunched tote bag, completely covering it. Now for the fun stuff... adding the colors! The dye comes in nifty little shaker bottles, which make it easier to sprinkle over the ice. Be sure to put on your face mask/dust mask/respirator and gloves before you start working with the dyes. Safety first! Plus, you probably don't want ice dyed hands.

You can add the dyes in any pattern and order you like. We chose to start with the lightest color, yellow, and sprinkled it in a couple spots. Next we added the green, overlapping the yellow in some places and then finished with the blue, making sure to cover all of the ice. We wanted saturated colors, so used all of the provided dye.

While the ice melts, cover the box with a lid or plastic wrap and let it sit overnight. The instructions tell you to rinse out the bag after the ice melts, but we were hoping for darker colors, so decided to leave the dye on longer. We left the dye on the bag a total of 24 hours.
When you're done dyeing, put your gloves back on and plunge the bag into a bucket of cool water, swish and scrunch the fabric around, then rinse in running water until the water runs clear.
The last step is to wash it. We used Synthrapol, a detergent specifically designed to remove excess dye from fabrics, but you could use laundry detergent or even a drop or two of dish soap.
After the tote bag is thoroughly washed and rinsed, throw it in the dryer with an old, clean, light colored towel. The towel will help it dry faster and will keep any excess dye from depositing in your dryer. You could also use a commercial “color catcher” but we find that a white towel works just fine.

Isn't it pretty?! Extra bonus, the color on one side is completely different from the color on the other side, you never know what you are going to get.
The bag itself is nice too. It’s medium weight cotton and there’s a small pocket on the inside that the whole bag can fold up into for convenient carrying. Good looking, useful, and uniquely you - perfect!
Get the kits here.