Wonky Four Patch - Part 1
February's project of the month is a wonky four patch quilt made from Grunge Hits the Spot 10' squares. The finished quilt will look something like this ...
"Something like," because obviously my quilt is still in progress, and because this project is designed to be random and unique. All my four patch blocks are done, but I'm still moving them around on my design board to find the composition I like best.
Now that you have an idea of our final look, let's go a few steps back and talk about how I selected the colors for my block groups. To make the blocks for this quilt you need to divide the squares into groups of four (each group will make 4 blocks). My package came with 42 squares, so I could make up to 10 groups of four. I decided I wanted my quilt to be 5 x 7 blocks or 6 x 6 blocks, which means I need nine groups of four (36 sqs total). Ok, task number one is to eliminate six squares.
I selected 36 squares, then folded them in quarters and laid them out side by side.
Anything stand out? Yes! The white immediately draws your eye, and not in a good way. For this quilt I wanted a harmonious mix, and not a focus color. The white has to go.
Besides eyeballing it, try taking a photo in both color and black and white. You will see things differently.
The white is even more obvious in the black and white photo.
Take two - I replaced the white with lavender and the pink with yellow. I think the pink worked ok in the mix above, I just have personal issues with light pink and wanted to bring in the purple so the dark purple had a light companion.
This time I didn't like the yellow and replaced it with a second lavender square. Much better. In the end, I eliminated two white, two yellow, and two pink squares.
Next, I divided my colors into warm vs cool, and then split the warm and cool groups into light and dark halves.
(top left = warm dark, top right = cool dark, bottom left = warm light, bottom right = cool light)
You will have to imagine the lavender in place of the pink and white. I forgot to retake the photo after I finished playing with my colors. I'm sure you get the idea anyway.
At this point there are four groups of nine squares, but we want nine groups of four. To make my final groups I pulled one piece from each group. Taking the time to divide your fabrics into four groups and then building your sets helps ensure there is balanced color distribution and contrast in every block and across the entire quilt top.
I set myself a few other guidelines for selection my groups. Each group of four should have no more than one neutral color (creams, browns, greys & black) and the remaining three colors selected should include as many varied colors as possible. In other words chose a neutral and try not to select three blues in the same set. Here are the groups I came up with.
You won't be able to keep to all the guidelines/rules in every group (there is a lot of blue and orange), but the more you can, the more unified the finished quilt top will look.
In the example group below I have two blues, but I tried to keep them as different as possible by selecting one dark blue and one lighter and brighter blue.
You can apply the same principles to other groups of fabric, or try dividing your fabric by color family, print size, value, or whatever else strikes your fancy. Just shoot for even distribution of color/print across the quilt top and enough contrast in the blocks to see each section clearly.
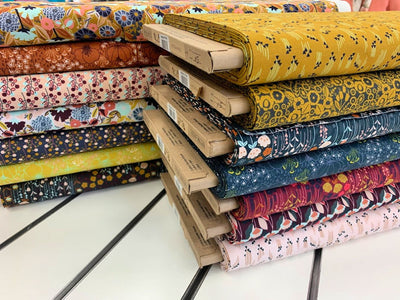
Here's an example with prints from the Garden Delights bundle. With this fabric I first spilt the pack into color groups: red and purple or blue and green. Then I split each color group into a light and dark group. I also tried making four color groups, but found there wasn't enough contrast.
Pulling one fabric from each group you'd get block something like this...
A completely different look from the Grunge collection, but equally pretty.
Next post we will go over how to construct your wonky four patch blocks and put them together. No pattern required!
Cheers,
Samantha